DJI just release Phantom 2 with extra feature to have CAN Port expansion on their leg. Also the physical of Phantom 2 is far different than Phantom 1. Bigger battery, 9″ propeller, CAN bus port expansion.
But for me. I still don’t want to upgrade. I have Zenmuse H3-2D and not able to use with Phantom 2 because mount is not compatible and DJI don’t sell mount separately. And I have many battery for old Phantom.
Then my target is modify current P330-H3-2D main board to have CAN Bus. I think DJI still use CAN protocol between equipment. So, It should possible to hack their main board.
– I tear apart my DJI PMU-V2 and check it’s schematic on CAN port. I found it have 4 pin (Regulated Voltage, GND, CH, CL). The CH (CAN High) and CL (CAN Low) pin attach to one IC on PIN 2, 3.
– Back to P330-H3-2D board. Please focus on the my pink circle mark. This is the place for do modification.

– Use cutter or any tool to remove epoxy on GND, Regulate Volt PIN as I show.
– Use a small screw driver scratch and remove protection film on CH, CL circle mark.
– Please use small tip soldering iron if possible. You may damage your board if your soldering iron is too hot! (Thanks Roderick on Facebook for this concern).
– Solder four wires to GND, RV, CH, CL mark as I show on below picture. I’m using White as Regulated voltage, Gray as GND, Blue as CL and last wire as CH.
– Please keep in mind RV is not battery voltage! it’s REGULATED voltage!
– Please apply some epoxy to fix the cable and prevent short circuit :-)

– I put other side of cable outside Phantom 1. I don’t have their CAN Bus port and don’t know where to find it in Bangkok. :-(
– (Update) I knew how to get port. It’s a workaround solution but good for anyone who plan to use FPV. You can take a part iOSD mini and solder four wires direct to iOSD mini. And you will have DJI official CAN Port as below picture :-D
– Please be careful on plug it into DJI cable. Cable must be in Reg-Volt, GND, CH, CL order.


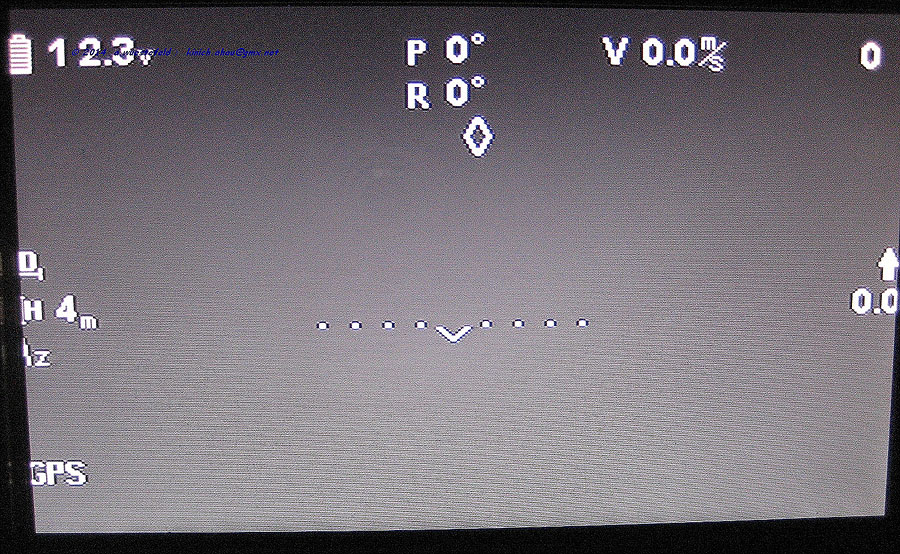
– Done! now your Phantom 1 with P330-H3-2D board will able to plug *ANY* DJI equipment. iOSD Mark 2, iOSD Mini, iBTU, 2.4GHz module, etc. I’m using it with 2.4GHz with iBTU and iPad on below picture.


I hope you will able to follow my instruction and have fun with flying the old Phantom.
มีความสุขในการบินกันทุกคนนะครับ :-)
Modification picture from our friend Andreas. He have a great idea for put his iOSD inside phantom but instead of direct solder four cables into board. He use JST male/female to hook it.
He cut JST cable into two as below picture.
Solder the female cable on P330 main board.
And solder mail cable on iOSD board. (Please do *DOUBLE CHECK* on RV and GND point)


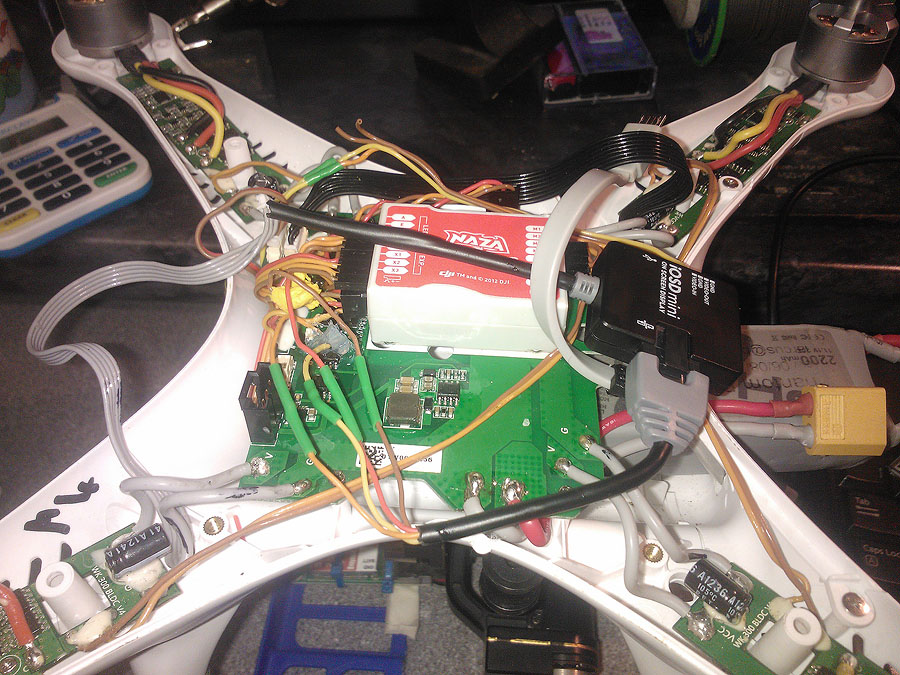
And this is inside his phantom.
Four wire for plug to Video link. Red = Volt, Black = GND.
And he also adjust the OSD icon location on assistant software then ready to fly !! Thank you very much Andreas.


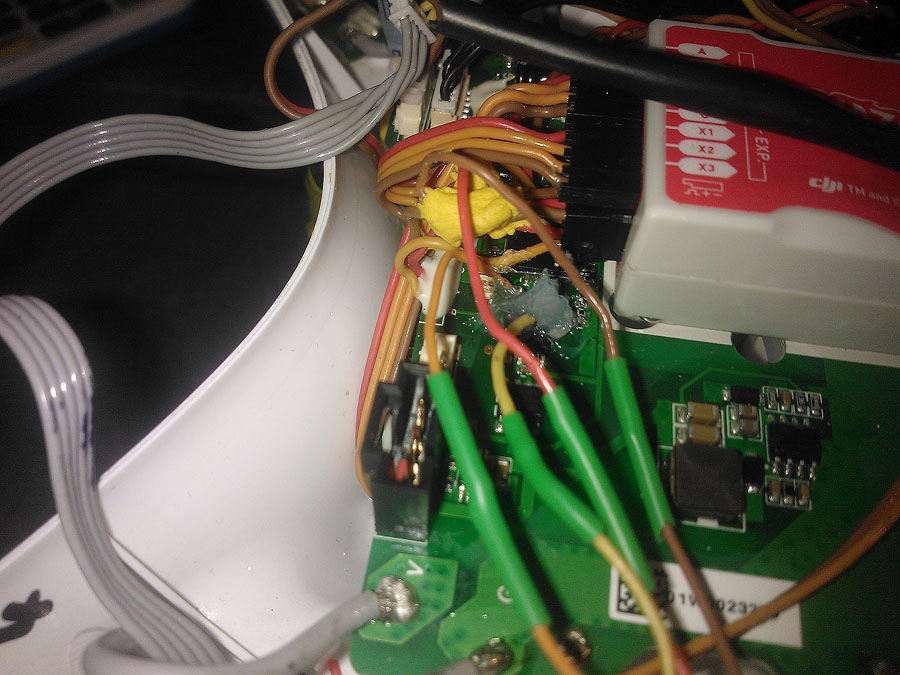
This is image came from Marcus Dawson, he modified his Phantom 1 to put iOSD mini inside. He cut a cable and direct solder into main board. Please see below image and description from him :-)
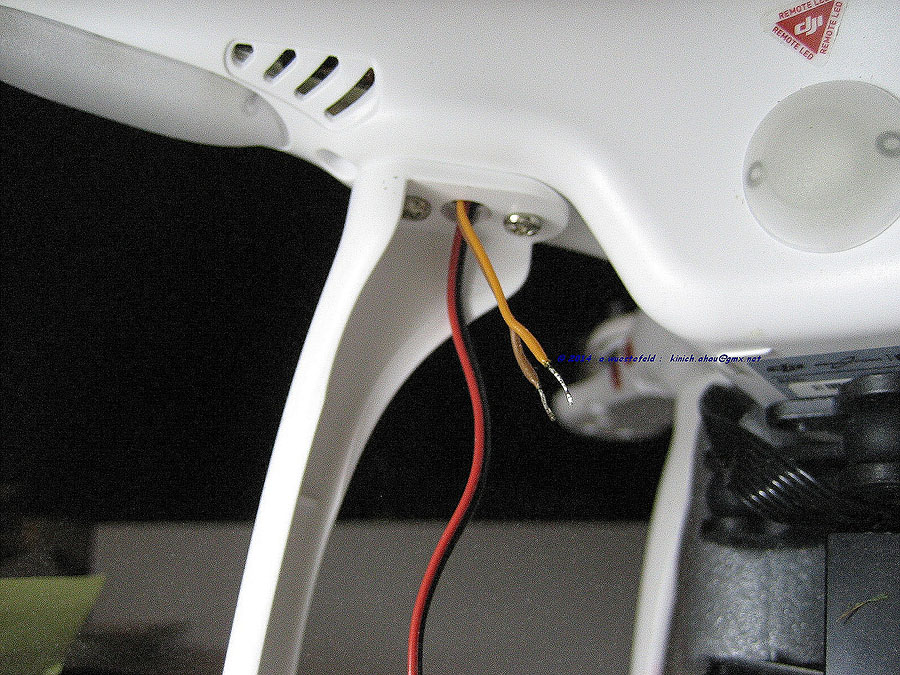
“Shows the joined cables with orange on the left and yellow on the canbus ports (and my huge blob of silicone covering the points.)”
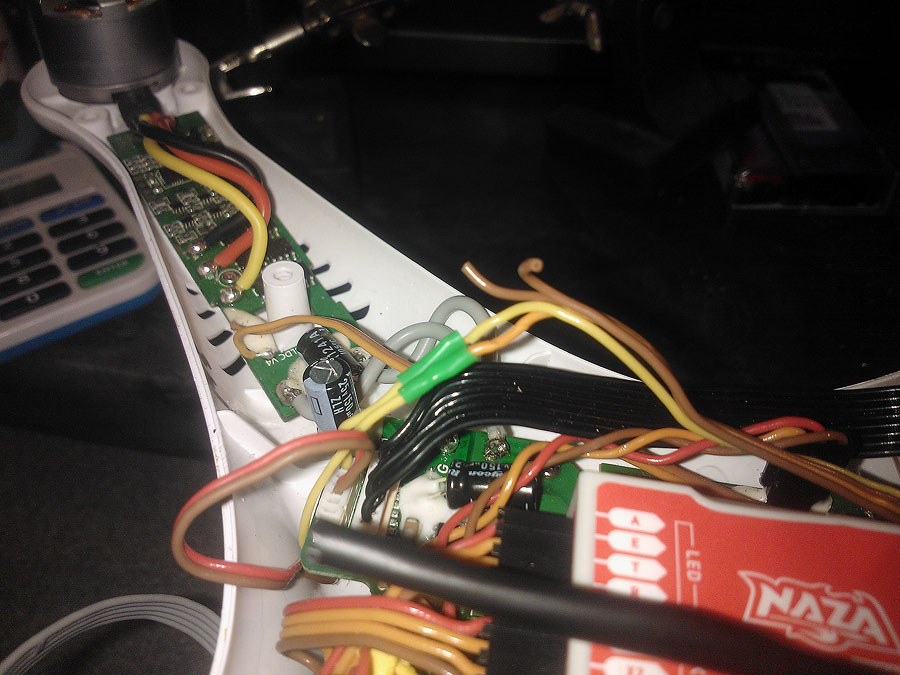
“shows the iOSD connected up via my canbus cable. You can see where I’ve lopped the original connector off the end. Again, in hindsight I could have left it on.”
“Shows the video connection. I’ve pulled the yellow wire ‘off’ the zenmuse ribbon. Cut it and inserted the iOSD cables in here. It’s yellow off the board to iOSD yellow and then iOSD orange to yellow going to FPV TX.”


Wow this is a great trick. You need to be thanked!
I have a question, do you think the upgrade board can safely accept 4s lipo batteries?
I have been searching the web for weeks, trying to find a solution for exactly this problem, and I know a lot of other people are looking for it too. Thanks a million times!!
I’m glad that you love it.
Nice work! Exactly what I was looking for! I’ve been wanting to add an iOSD Mini but was told it was impossible without first downgrading the H3-2D board.
Give me your thoughts on connecting the iOSD to the soldered leads. Would you cut up and splice the iOSD Mini’s attached cable?
For me. If I’m going to use this for FPV. I’ll cut off the cable and solder directly to iOSD. Save space and cable weight.
Sarawuth, Thanks for your insight and quick reply.
Sarawuth… I have seen you are on Bangkok… I am too….! I’ll come back to Bkk on the first of february, with my phantom1… Would you agree to meet me… Ad why not to fly together on nice places… Please, feel free to contact me on gib.ced@gmail.com…
Happy new year…:)
Cedric
Brilliant, Sarawuth !
The best hack for the Phantom 1. All others talk about “you can not use the iOSD mini pure with the extension board”, YOU can ! I will try as well and revert with the results. iOSD is already on the way. Hope it will work, I plan the osd placed inside the hull in that way to get the USD access from outside for upgrading. As I understand you have to use the separate Program for OSD firmware upgrade or does it also work around the Main Assistant Software ?
I think better wait DJI to make make it able to setup/upgrade from CAN bus. It not possible on software part.
means, like this, i don’t need the pmu v2, right?
Klaus, yes. This upgrade board already have PMU plus GCU (Zenmuse control board) inside.
I have just made the upgrade as described, and after som really high-tension soldering of the ch and cl wires, I am now looking at fpv-video with the iOSD data on it. It works great. I put the iOSD inside my Phantom after cutting and stripping the can-bus wire and soldering directly on the board.
Can someone tell me after stripping the iosd mini’s wires. What color does each wire go to?
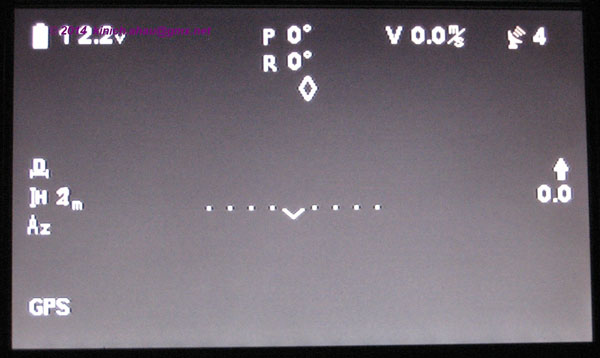
Got my iOSD mini today and couldn’t wait to install: Took its time due to carefull removing the white gum, but: I GOT IT! Desoldered also the existing Bus-cable and plug from the iOSD mini and soldered a new one made from a simple balancing extension cable (cut in the middle and use it vice versa). So I have a “fake” CAN-bus 4-pole connection within this cable, can place the OSD inside the Phantom, can still unplug the iOSD mini – if needed -, and have the original CAN-Bus at the iOSD mini still free available. Updated Firmware to V1.4 via micro-USB and iOSD Assistant 4.0 Software. New Azimuth now also available. All works fine. Thanks for the good investigation !
Andreas, that sounds excellent! Any chances you took some pictures? I’d love to see.
Hi Ralphman5000, yes, of course I protocol my last night job. Just have prepared the pictures. Still looking for a place to publish:
Sarawuth: do you agree if we can publish here so that it fits to the subject? I can send you the pictures and you can resize as needed. Would be great as I the majority still think they need additional hardware, and here we can collect various different modification Jobs a la Sarawuth with related pictures. (I have not flown yet, and also still need to adjust the right side icons position via the Assistant Software, but I am sure the main job is done.)
Just thought about how long this mod will last. Trust with a simple software mod DJI can cut off our work. Actually it is (still) running but I am afraid to do further updates from now on (but why changing running system?) See the IMU 1.6 update problems for the H3-2D via the 330Expansion Board: very fast tilting now which nobody likes, but no way back yet. In the meantime DJI is already on IMU 1.8 update (still no smooth tilting as before in 1.4) but I did not even take that unless its clear the tilting is as smooth as with the 1.4 edition which runs flawless with me. So be careful to take all updates, inform yourself in advance about pro & cons.
Happy Flights and good Camshots!
Andreas, yes please send picture to — and I’ll post it here :-)
Sarawuth: have you hooked up the iosd directly to the board?
Damian: not yet. But I will show how to do with photo tomorrow (late night here).
Sarawuth: Two emails with my pictures are out. Hope they clarify some questions.
damian: you will see on my pictures: its easy to use a balancing extension cable and get a nice removable connection. Color connection of the original Can-Bus cable is as follows: CL = Yellow, CH = orange, GND = brown, RV = red. With my new cable of course now I have different cable colours.
Ralphman5000: Trust my pictures will pop-up soon when Sarawuth has time.
Still funny that not much people know about this nice option. Thanks again to Sarawuth for your inside views!
Regards and happy FPV,
Andreas
(Germany)
Great MOD SaraWuth! I received all the FPV stuff today and couldn’t install the iOSD mini because of this stupid mistake by the missing CAN BUS. I’ll be doing the soldering this weekend I think. Also very curious about your mod Andreas, already did multiple refreshes to see the new pictures ;)
And what about leaving the epoxy and soldering of GND and RV for what it is, and just open up the connected 2 cables and solder the cables for the new CAN BUS straight onto the cable? And then close it up with shrink tape to avoid short circuit?
Thumbs up,
Dennis
Sarawuth,
This is owesome. Thanks for it.
BTW. Do you know what is “Reserved” port on P330-H3-2D main board and what is that for? What can be connected to it?
Andreas, I already upload your photo and put some comment. If you feel it not correct or need any adjustment. Please feel free to let me know. Sorry that I can’t put all of your picture.
And the TX, RX point on iOSD is really interesting. I’ll try to hook serial debugger and see what it show.
Thank you Dennis, you have a point. It can be done that way.
Thank you Grzegorz, I still not sure about that. I’ll check later :-)
Awesome work guys. I just opened up my Phantom and will attempt to do this mod =P I will mount the electronics outside and make cables so everything can disconnect. I wish those MOLEX pico blades are easier to come by because the ones that came with the iosd are already used up!!
Anyways, I had a question: I wish to use 4s with my Phantom. Is it safe to do so? The Zenmuse does not power up when I plug a 4s battery in. The motors arm and it flys but I didn’t want to stress it too much. Is it just a matter of switch up capacitors on the board?
Sarawuth
Thanks. I don’t have DJI PMU-V2, but you mentioned that you looked inside of it. Can you please send me the picture of CL and CH pins of Can-bus plug that goes to EXP port in NAZA? Maybe this two pins CH and CL can be connected directly from EXP port, and there is no need to solder them from main board?
Did you checked it?
I don’t have DJI PMU-V2 nor GCU, but on Zenmuse-H3-2D manual.pdf there is a connection diagram of connecting DJI PMU-V2 to NAZA. I see two connections. One is to EXP port and second to X3 port on NAZA.
Maybe DJI PMU-V2 cable (Canbus-EXP port) can tell us more detailes?
What I saw from your connection diagrams, that we need to find CH and CL pins somwhere (of course RV and GRN are also important). You found them on the mainboard:) But maybe there is a way to connect them from EXP port?
I saw somwhere on the Internet X3 and EXP port Y cables adapters, so maybe there is no need to solder them from mainboard?
BTW. I am thinking od dessoldering Can-BUS port from unused Zenmuse H3-2D GCU, which I got with Zenmuse. It is useless with P330CB-H3-2D board, so…
This is I am thinking about.
Sarawuth: Picture selection is OK, just take the best of your choice.
The RX / TX also attract me, we should compare to the big sister iOSD Mark II, maybe we can somehow add the datacollection option with some hardware. At least i am happy to have the complete system up to now with minimum hardware (=minimum payload).
Regards from OCEANFLYER – Andreas
Hi, Grzegorz. You can’t direct plug CAN bus into EXP port on Naza :-( It need dedicate CAN Bus circuit.
Just great, can’t wait to actually get started! :) One more thing i was wondering about. Since i don’t need to take out the iOSD mini anymore after its in the Phantom, i’m thinking of cutting of the CAN BUS male on the iOSD and open up the cables inside and solder these directly to the board. This should be possible, correct? Thanks guys!!
Kevin, I not sure why it not power on when using with 4S. They may have some circuit protection or remove regulate circuit out from the board.
Dennis, possible :-)
Dennis (15/01): carefull, you need the regulated voltage. Can only recommend to connect all four cables as described as I can confim it works brilliant. See the pictures.
Kevin: look to the pictures, it is already disconnectable but placed inside and not hanging outside. Anyhow why should I dismantle the iOSD? its like to switch off the speedometer in your car… Its a tool and info for the Driver / Pilot.
Sarawuth: Lets investigate what else is possible. See the instructions of the iOSD Mark II, hope you find out what the RX TX and GND is for. Flight Tracking would be the final good idea, similar as to FLYTREX. Furthermore the board is called “NAZA OSD V2” so it may have s.th. to do with the NAZA or the BTU Module (don’t ave that not to disturb the navigation, but
I am just thinking about a simple switch in the RV cable to switch the iOSD on and off or if you will loose the Video signal to the TX as well. But then cancelled that as I am already on the way to buy a small SD Card recorder for the Groundstation, there all OSD can be recorded and the good picture can be recorded on Board with a GoPro or whatever camera you have. The power consumption of the iOSD mini is as per DJI, so who cares…
OCEANFLYER
forgot the power consumption value:
as per DJI iOSD manual it takes 180mA@6V.
Questions:
1:What is the advantage of a BTU module? I have no Iphone or so. And it use another 240mw(0.04A@6V)
2: Has anybody OSD Mark II (the big sister with data collection) and can provide inside picture of the board?
Happy Flights !
Can somebody check if in this configuration you can connect the BTU to the free Can-Bus of the OSD without extra PMU (or with the built-in PMU of the extension Board) to avoid the USB Cable. Theoretically it should work, Can-Bus is Can-Bus. I have no BTU but this question pops up in another forum. Thx, Andreas
Andreas: I tried the BTU connected to the IOSD mini and it did not connect. There was a red light. My BTU works with the IPAD Ground-station, it also works with the NazaV2 PMU on my F550. Also, I have not fully tested my Zenmuse yet, but it seems that sometimes, it won’t initialize. The GOPro receives power but the Zen doesn’t operate, I repower and it works. I will keep an eye on it and report back.
Thx Kevin, yes please investigate: Did you recheck yr new solderings? Once working, once not working is not good. I hv no BTU, but Zenmuse + iOSD mini works proper here (up to now when doing inhouse tests). Will revert after doing further powering ups & real flights (bad weather permit that).
Thanks Sarawuth!! Works perfect! Thanks Andreas for your help too!
Kevin: check here if you find comparable symptoms: http://www.rcgroups.com/forums/showthread.php?t=2059447
Ruined my first upgrade board while trying to solder the CH & CL. Definitely not easy :/ Disappointed that DJI hasn’t come up with a solution yet and we probably won’t see one now that their focus seems to be on the P2. Guess I’m ordering another one.
Sorry to hear that Serge. If the board still work you can solder at IC pin. It more difficult. But you may able to complete with out purchase new board.
Mine is working like a charm!! Also changed the body of the P1 and replaced it for a P2 body. Enough space for 2 x 2200 lipos. Also tried with 3700 lipo. Next tests will be with 2 x 3700 and one more with a single 5000. I will record the fly times to see how long it lasts for the ones that are interested. Ontopic: thanks a lot you’s, you’ve made my day! Ps. I took out the connector of the Naza and connected CH and RV straight to the cables inside the black connector. So didn’t touch the board for those 2 cables. Also i just cut off the buscan connector of the iOSD mini and soldered the 4 cables to the discribed spots. If interested i could make some pictures to make this story more sence.
Cheers!
Serge, I feel your pain. I burned my upgrade board on the CL point too. I obtained a new one but before touching it, I used the ruined board to practice my soldering skills on.
Once I gained some confidence, I was able to get all four points connected and the iOSD mini working BUT, to my disappointment, my GPS module had stopped working and my Zenmuse was freaking out. I was sure that I had ruined a second upgrade board in as many days.
Closer inspection revealed that I had reversed my connections to CH and CL. This meant another nerve wracking soldering session. In the end I was able to make the proper connections and everything now works. *whew*
Thanks again to everyone who provided pictures and instructions for this mod!
Gents, feel sorry for the smoking boards, But indeed it is a chirurgic soldering Job. Good to see that it finally works fine.
Another addon: I added a simple mini SD DVR (this type: http://www.rchacker.com/reviews/mini-d1-sd-card-video-recorder-teardown ) for groundstation recording. Advantage: This DVR add the actual timestamp to the OSD which complete the picture for documentation: Now three different OSD overlays on the same screen, not disturbing each other too much and still good readyble: 1: GoPro infos, 2: iOSDmini itself and 3: the DVR with timestamp. (A screenshot sample from indoor test setup is available on request or can be added to the picture gallery above.) Works fine, but i’m still waiting for better weather for real outdoor flight.
brgds,
Hello
Can I use the Can Bus port somehow the original DJI create Phantom 1.1.1. That would be great if I could save the PMU in order to save weight.
Thank you Jens
Hi Jens, only way is you have upgrade board. And to make sure is open your Phantom and check the board. :-)
Hello
Thanks for the reply-I no upgrade kit have built-in – phantom 1.1.1 with Naza M V2 – can I build as well as the CAN bus port?
Thank you Jens
/// Sarawuth/Andreas
Great mod! I may extract my PMUv2 and buy a H32D board instead to save weight!
I also want to install the Phantom2/Visions motors and ESC’s as they are said to be more efficient and contain better bearings, etc. However the P2/V ESC have 4 wires coming into the ESC board. The P1 has only 2 wires on the older Phantom ESC version.
Can I install the P2 ESC/motors in my P1??
Do you know what the pin out is for the 4 wires?
Also there are no longer green ESCs and red ESC. Probably bi-colour LEDs are used. Not sure.
My goal is for ~20 min flight times on 3S or 4S.
/// Dennis
I plan to get a P2 body also! Any issue in mounting the components inside like the main board? Or receiver?…
Does all of the osd info show gps and speed ?
Hi Dennis,
sorry I don’t have Phantom2, my is the V1.2 now with upgrade Board (and CanBus – hihi).
I recommend to check the various Discussion Groups about your question.
Happy flights,
Andreas
Jreo, everything fits fine! You only need to makea hole in the body to use the LED, since the P2 used the LED’s on the very expensive P2 batteries. The battery compartment gives you space for 2 x 2200 easy. I’m modifying the battery slot now so it can hold a 3700 + 2200. Already did test flights with this setup including the Zenmuse + upgrade kit board + iosd mini + fpv 400 and getting 18-20min flights easy with a lot of trottle used going up / down / left / right / etc. Now i’ve also adjusted the voltages in the software so it will be even longer i think. Didn’t test this yet since it’s crapy weather lately and my Zenmuse is acting weird. Probably need a replacement for the zenmuse since its still in warrenty. Next flights i will record the whole flight to see exact timing etc. Cheers and good luck mod’ding :)
Hi Dennis,
congrats to your mods, looking fwd to see your videos.
Back to the topic: I wonder if it might be possible to go deeper into the iOSD Software. Maybe one day we can modify the displays? Full GPS Coordinates would be nice (NAZA know them, flytrex use them) and probably the status LED condition for example. The iOSDmini board has an RX and TX pin, is somebody able to dig into this ?